
> Laboratory Techniques > Microscopy and Cellular Imaging > Forge Precision: Preparing Biological Samples for Electron Microscopy
Forge Precision: Preparing Biological Samples for Electron Microscopy
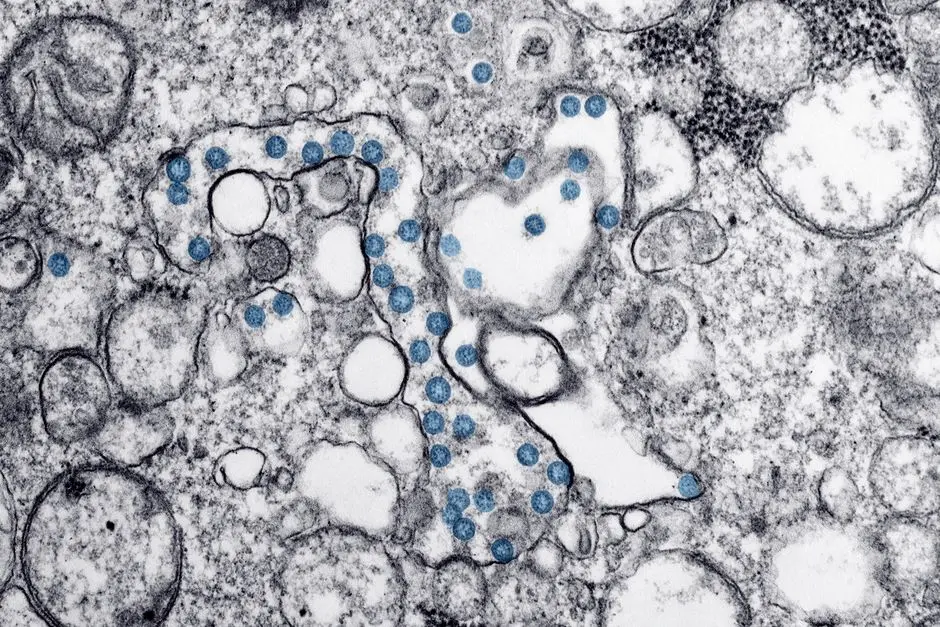
Embark on an unparalleled journey into the nano-world, where every cellular detail matters. Electron microscopy (EM) stands as our most powerful lens into the intricate architecture of life, revealing organelles, macromolecular complexes, and pathogen interactions with breathtaking clarity. Yet, the extraordinary resolution capabilities of EM are only as good as the samples we present. Improper preparation is the genesis of artifacts, masking true biological phenomena and compromising invaluable research.
This comprehensive resource unveils the strategic imperatives and meticulous methodologies essential for preparing biological specimens for electron microscopy. We dissect each critical step, from the instantaneous stabilization of living tissue to the final staining that renders structures visible, ensuring you command unparalleled precision in your ultrastructural investigations. Understanding these rigorous protocols is fundamental to achieving high-fidelity images, providing a crucial cornerstone for advanced biological inquiry. We propel you beyond surface-level techniques, equipping you with the insights to conquer common pitfalls and elevate your experimental outcomes. Mastering the nuances of sample preparation is indeed the gateway to unlocking profound biological discoveries within the realm of advanced laboratory imaging methods. We empower you to unveil the hidden truths of cellular organization, one perfectly prepared sample at a time.
The Foundational Imperative: Fixation for Ultrastructural Integrity
The initial and perhaps most critical step in preparing biological samples for electron microscopy is fixation. Our objective is to instantaneously halt all biological processes, preserving the sample's ultrastructure as closely as possible to its living state, preventing autolysis and degradation. We employ two primary strategies: chemical fixation and cryofixation.
Chemical Fixation: This method typically involves a two-stage process. We first introduce glutaraldehyde, a powerful cross-linking agent that forms covalent bonds with proteins, stabilizing cellular components. For optimal preservation, we use concentrations ranging from 2.5% to 4% in a physiological buffer (e.g., 0.1 M phosphate buffer, pH 7.2-7.4) at 4°C for 2-24 hours, depending on tissue size and type. Following thorough rinsing to remove excess glutaraldehyde, we proceed with osmium tetroxide (OsO₄). OsO₄, typically at 1-2%, serves dual purposes: it further cross-links lipids and proteins, and importantly, it acts as a heavy metal stain, enhancing electron density for better contrast in the final image. OsO₄ fixation usually lasts 1-2 hours at 4°C. A critical aspect is maintaining physiological osmolarity throughout, as imbalances can induce cellular swelling or shrinkage, leading to artifacts.
Cryofixation: For the most pristine preservation, we turn to cryofixation, a technique that arrests biological processes by ultrarapid freezing. This method minimizes chemical alterations and allows for visualization of dynamic cellular states. Techniques include plunge freezing into liquid ethane, high-pressure freezing (HPF), or slam freezing onto a cooled copper block. HPF, in particular, permits vitrification of samples up to 200 micrometers thick without ice crystal formation, a major cause of artifactual damage. The choice between chemical and cryofixation hinges on the research question and the target structures, with cryofixation generally preferred for its superior preservation of macromolecular complexes and membrane integrity.
Dehydration and Infiltration: Architecting Sample Resilience
Once fixed, biological samples are largely composed of water, which is incompatible with the vacuum environment of an electron microscope and the hydrophobic epoxy resins used for embedding. Therefore, we meticulously dehydrate the tissue and progressively infiltrate it with embedding media. This sequence is paramount to prevent structural collapse and ensure mechanical stability.
Dehydration: We systematically remove water through a graded series of increasing concentrations of a dehydrating agent. Ethanol and acetone are our primary solvents. A typical ethanol series progresses from 30%, 50%, 70%, 90% (or 95%), to 100% absolute ethanol. Each step typically lasts 10-30 minutes, with smaller, delicate samples requiring shorter durations. For challenging tissues or specific applications, some protocols might incorporate intermediate solvents like propylene oxide, which is miscible with both ethanol/acetone and epoxy resins, facilitating a smoother transition. The goal is complete water removal without excessive cellular extraction or damage from osmotic shock, which we mitigate by gradual concentration increments.
Infiltration: Following complete dehydration, we gradually introduce the embedding resin. This is a critical transition phase where the dehydrating agent is slowly replaced by the unpolymerized resin mixture. We begin with mixtures of resin and the dehydrating agent (e.g., 1:2, 1:1, 2:1 resin:ethanol/acetone) for 30-60 minutes each, ensuring thorough penetration into all cellular compartments. Subsequently, we transfer the sample into pure, fresh resin. This step is often performed over several hours or overnight, particularly for dense tissues, to guarantee complete saturation. Insufficient infiltration will result in brittle blocks that are difficult to section and exhibit poor ultrastructural integrity. We often utilize rotating agitators to enhance resin penetration, particularly for larger or denser specimens, thereby optimizing the infiltration process.

Embedding, Sectioning, and Mounting: Precision at the Nanoscale
With the sample thoroughly infiltrated, our next challenge is to solidify it into a block amenable to ultra-thin sectioning, then section it with unparalleled precision, and finally mount it for microscopic examination. This sequence demands meticulous attention to detail and specialized instrumentation.
Embedding and Polymerization: We transfer the fully infiltrated sample into a mold (e.g., beam capsules, flat embedding molds) filled with fresh, unpolymerized resin. The resin mixture typically comprises an epoxy resin (e.g., Epon, Araldite, Spurr's), a hardener, an accelerator, and sometimes a plasticizer. The choice of resin affects hardness, sectioning properties, and electron beam stability. We then place the molds in an oven for polymerization, typically at 60-70°C for 24-48 hours. This process transforms the liquid resin into a solid, durable block encasing the biological specimen. The resultant block must be homogenous, free of air bubbles, and possess optimal hardness for subsequent sectioning – not too hard to damage the knife, nor too soft to tear during cutting.
Ultramicrotomy and Sectioning: This is where nanoscale precision becomes paramount. We use an ultramicrotome, a sophisticated instrument equipped with either a diamond knife or a glass knife, to cut ultra-thin sections. For transmission electron microscopy (TEM), sections are typically 60-90 nanometers (nm) thick – roughly 1000 times thinner than a human hair. The knife angle, cutting speed, and block advancement are meticulously controlled to produce a continuous ribbon of sections. We float these sections onto a water trough behind the knife edge and then carefully pick them up using fine forceps onto electron microscope grids.
Mounting and Stabilization: EM grids are typically made of copper, nickel, or gold, with mesh sizes ranging from 50 to 400. We mount the sections onto these grids, ensuring they lie flat and are free of folds or tears. For delicate sections or to improve conductivity for certain imaging modes (e.g., scanning electron microscopy of non-conductive samples), we may apply a thin layer of carbon coating to the grid and sections using a vacuum evaporator. This enhances stability under the electron beam and prevents charging artifacts.
Staining, Common Pitfalls, and Best Practices: Maximizing Contrast and Fidelity
Even with meticulous preparation, biological samples inherently possess low electron density, meaning they scatter electrons poorly and appear nearly transparent in an electron microscope. Our final crucial step is to introduce heavy metal stains to enhance contrast and selectively highlight ultrastructural features, allowing for detailed visualization.
Staining for Contrast: The most common heavy metal stains we employ are uranyl acetate and lead citrate. Uranyl acetate, typically used as a 0.5-2% solution in water or alcohol, binds strongly to nucleic acids, proteins, and some lipids, providing excellent general contrast. We often apply it for 10-30 minutes. Following thorough rinsing, we use lead citrate, usually a 0.1-0.4% solution, for 2-10 minutes. Lead citrate preferentially binds to glycogen, ribosomes, and some proteins, further enhancing electron density. The specific staining protocol—concentration, duration, and sequence—is often optimized for the particular specimen and research objective. These heavy metals provide differential electron scattering, rendering the cellular landscape discernible under the electron beam.
Common Pitfalls and Artifacts: Even seasoned researchers encounter challenges. Common artifacts include:
- Poor Fixation: Swollen organelles, membrane blebbing, or large vacuoles indicate inadequate fixation or improper osmolarity.
- Incomplete Dehydration/Infiltration: Brittle blocks, shattered sections, or areas of electron lucency suggest residual water or poor resin penetration.
- Sectioning Damage: Knife marks, compression, chatter, or folds obscure ultrastructure. Adjusting knife angle, block trimming, and cutting speed is crucial.
- Staining Issues: Precipitates (lead contamination), uneven staining, or over/under-staining can mask details. Always use fresh, filtered stains and meticulous rinsing.
Best Practices for Success: To achieve optimal results, we adopt a regimen of best practices. Consistency in reagents, temperatures, and timing across samples is paramount for comparability. We always use fresh, high-purity chemicals, as degradation products can introduce artifacts. Careful handling of delicate tissues at every stage prevents mechanical damage. Meticulous record-keeping of every parameter allows for reproducibility and effective troubleshooting. Finally, practice and patience are invaluable; electron microscopy sample preparation is an art refined through experience, demanding a fusion of scientific rigor and technical dexterity. We embrace a proactive approach, systematically refining our techniques to consistently produce high-fidelity ultrastructural data.
Key Takeaways
Fixation: The First Commandment of Preservation
We stabilize ultrastructure using chemical fixation (glutaraldehyde & osmium tetroxide) for general studies, or superior cryofixation (plunge, high-pressure freezing) for native-state preservation, minimizing artifacts and arresting biological processes instantly.
Dehydration & Infiltration: Building Sample Robustness
We systematically remove water via graded ethanol/acetone series to prevent collapse, followed by progressive infiltration with unpolymerized resin to prepare the sample for solid embedding. Precise, gradual steps prevent osmotic shock and ensure complete saturation.
Embedding & Sectioning: Precision at the Nanoscale
We embed the sample in an epoxy resin, polymerizing it into a hard block. Then, we employ ultramicrotomy with diamond or glass knives to cut ultra-thin (60-90 nm) sections, which we mount meticulously onto EM grids for stability.
Staining & Troubleshooting: Unveiling Contrast
We enhance electron density and contrast using heavy metal stains (uranyl acetate, lead citrate) to visualize ultrastructure. We remain vigilant for common artifacts (poor fixation, incomplete infiltration, sectioning damage) and proactively troubleshoot to ensure high-fidelity imaging.
FAQ
-
What is the primary difference in outcome between chemical fixation and cryofixation for EM samples?
Chemical fixation, typically using glutaraldehyde and osmium tetroxide, stabilizes samples by cross-linking molecules. While effective, it introduces some chemical alteration and can cause slight structural rearrangements. Cryofixation, conversely, uses ultrarapid freezing to vitrify the sample, arresting biological processes almost instantaneously without chemical modification. This results in superior preservation of dynamic states, membrane integrity, and macromolecular complexes, minimizing artifacts associated with chemical treatment. We select cryofixation when the highest fidelity to the native living state is paramount.
-
How do we identify common artifacts caused by poor sample preparation, and what are the immediate corrective actions?
Identifying artifacts requires a trained eye. We look for several key indicators:
- Swollen or shrunken cells/organelles: Often due to improper osmolarity during fixation or dehydration. Corrective action: Adjust buffer concentrations and ensure reagents are at physiological pH.
- Electron-lucent holes or brittle sections: Signifies incomplete dehydration or resin infiltration. Corrective action: Extend dehydration steps or increase infiltration time, potentially using intermediate solvents.
- Knife marks, chatter, or compression: Mechanical damage during sectioning. Corrective action: Sharpen or replace the knife, adjust knife angle, slow down cutting speed, or re-trim the block.
- Heavy metal precipitates: Indicative of contaminated stains or improper rinsing. Corrective action: Use fresh, filtered stains and perform thorough washes between staining steps.
-
Why is the choice of embedding resin critical, and how does it influence the final EM image?
The embedding resin plays a pivotal role in determining the block's hardness and stability, directly impacting sectioning quality and subsequent imaging. Different resins (e.g., Epon, Spurr's, LR White) possess varying properties:
- Hardness: Influences how easily ultra-thin sections can be cut. Too hard, and the knife chips; too soft, and sections tear.
- Viscosity: Affects infiltration efficiency. Lower viscosity resins (like Spurr's) penetrate dense tissues more readily.
- Electron Beam Stability: Some resins are more stable under the electron beam, resisting shrinkage or damage during imaging, crucial for high-resolution work.
- Compatibility with Stains/Immunolabeling: Certain resins are preferred for post-embedding immunogold labeling due to better antigenicity preservation.